9

I have seen some simple jewelry designs made out of wire, which I'd like to replicate. These designs are made from a single piece of wire bent into a variety of shapes.

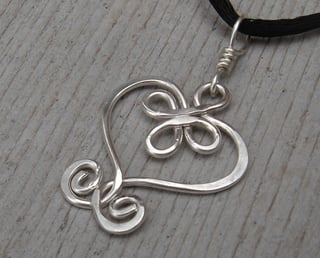
For portions of the design, the wire is still perfectly round. However, some parts are smoothly flatted. By smoothly, I mean that there are no creases or hammer marks.

Here's an example of what I'm describing:

enter image description here

How can I achieve this effect? Can I use steel wire, or does it need to be something softer, such as aluminum wire?

3 Answers 3

10

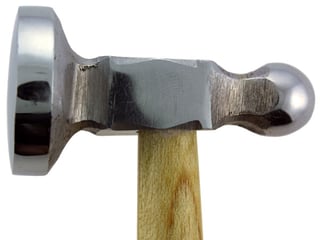
The flat parts of the wire are achieved by using a curved face chasing hammer and a hammering block. The chasing hammer has a slightly convex surface that makes those nice smooth transitions from the flat part of the wire to the regular rounded part of the wire. If the hammer surface is too flat you'll see hammer marks on the wire. Visually check the hammer face before buying to make sure that it is convex (slightly domed) and not fully flat or worse, concave.

Here's what one looks like:
enter image description here

The [my] hammering block is a smooth square of heavy steel about 4" x 4" square and quite heavy. The goal is to have a heavy and very smooth surface that's harder than the wire or metal being hammered so the surface doesn't get marked up opposite the side being hammered.

Steel wire is very hard to hammer and may be as hard or harder than the hammering block. Aluminum wire might be softer but I've heard it's brittle and might not take hammering well. Most of my experience has been with sterling silver, fine silver, brass, and copper.

The example photo is lovely but I was taught that it wasn't a good idea to hammer where wires cross as this makes weak spots in the finished piece. Maybe something has changed.
3
  • If I were to make anything similar I would try hammering first, then bending afterwards when possible. Does that affect strength?
    – user24
    Commented May 5, 2016 at 3:32
  • 1
    Hammering the flat areas first and then bending afterwards might affect the final shape. In theory this could work by bending a prototype—from an equal diameter but less expensive wire—and marking the areas where the wires cross with a Sharpie Straighten out the wire, hammer where the marks are, then try to re-bend the design. If it works and lines up, carefully straighten the practice wire and transfer the markings to a fresh working piece of wire, hammer the marked spots on the working wire and bend it into shape. Finish hammering any areas that don't cross after shaping.
    – Kellerra
    Commented May 5, 2016 at 23:33
  • @CreationEdge : hammering will 'work' the wire, and make it more brittle (and thus subject to cracking if you try to bend it afterwards). Bending is more gentle, so typically done first. (although if you bend it back and forth repeatedly, you'll work it so much that it'll break).
    – Joe
    Commented Jul 19, 2016 at 17:24
3

You don't necessarily need a specialist hammer, a small ball pein or cabinet makers pin hammer from a hardware store will do the job. However you may need to polish the face as any scratches or defects in it will transfer to the work. Foam backed abrasive pads are good for this as the naturally create a slightly convex face.

You will also need something to hammer onto, for soft wires like annealed copper or silver a hard rubber block may be adequate, for steel wire you will want something a bit firmer like end-gain hardwood (e.g. a beech chopping board or 'butchers block) or a polished steel anvil.

Obviously your hammering technique is critical your strikes need to be both correctly weighted and accurate and this only comes with practice and the correct weight will depend on the hardness and ductility of the wire you are using.

0

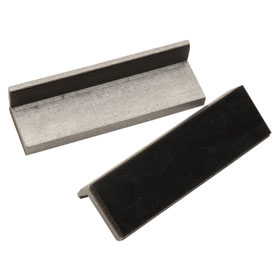
If you're aiming at producing more than one-off copy, it may be beneficial to use slanted jaws for a vise.

Just two pieces of aluminum L-profile, which you can put over the vise jaws, with something to slant them a little - a length of wire, or a couple small screws or something like that along the "bottom" side, to make the lower parts to come together sooner than the upper parts.

enter image description here

You can then reliably, smoothly, easily and in a controlled manner flatten the wire without risk of missing the spot with the hammer.

2
  • Why L-profile? Why should the lower parts meet first?
    – user24
    Commented Jul 19, 2016 at 4:22
  • @CreationEdge: L-profile so that one side of the L sits on top (upper side) of vise jaws preventing the profile from falling, while the other covers the faces of them, providing a smooth pushing surface. Slanted, because otherwise you'll get a sharp dent at the point where the workpiece enters the vise (at the upper edge of the L-profiles). With the slant, the bottom part provides maximum compression, the top - none.
    – SF.
    Commented Jul 19, 2016 at 4:39

You must log in to answer this question.