16

When drawing pictures with a pencil, I often want to create a more or less solid darker colour in some region. It's easy to shade an area so that it appears a solid dark colour from a distance, e.g. by hatching or cross-hatching, but I'd like to be able to blur the lines in a hatched or cross-hatched area so that the darkness is uniform even when looking at the picture close up.

In the past I achieved this using a special eraser I had. As an eraser it was very bad, since instead of rubbing out pencil marks it blurred them and made them spread darkly across a bigger region. This, however, made it perfect for creating uniformly dark areas in pencil drawings.

Now that I don't have that eraser any more (or at least, I don't know where it is to lay my hands on it), I'd like to know a better method.

After shading an area with pencil strokes, how can I blur these strokes together to get a uniformly dark region?

2
  • That sounds like basically any eraser you pick up at a dollar store or one of those horrible "eraser toppers" that you can get from Oriental Trading or Walmart. Commented May 23, 2016 at 13:08
  • At art school our teacher , whom I knew as very orthodox to teach grammatical rules, strongly opposed smudging with fingers upon pencil sketch & study. He advised to use fine strokes in various tones (1st tone, 2nd tone etc) varying hand pressure and pencil-grade. He emphasized on developing more hand-control to the given-technique than finding short cuts. However there was no restriction about what we were trying at home/study-school etc.
    – user1091
    Commented Oct 18, 2016 at 17:28

3 Answers 3

24

The blurring you're talking about sounds like blending, which is the technique of evening out or gradating values and colors.

Fingers

Probably the simplest way of blending your regions together, whether matching values or values you want to merge together, is by rubbing it with your finger tip! You'll want to make sure your fingertip is clean, and oil-free, so that you don't smudge it with something else. Then, you simply rub. The direction you rub can have an effect.

  • If you have two parallel lines and rub following their direction, you won't get much blending between them. Instead, you'll end up just blurring the lines, instead of having sharp edges. This technique is often used to blur the curved lines when shading spheres, on of the most common shading practice exercises for beginners.

  • Blending at angles away from the lines will great a smudge of sorts that causes a gradation from the lines value to a light grey. The closer the lines, the less likely you'll run into greys. You can see this by just drawing a dark area on a blank page and smearing away, to see how your pencil and pencil pressure have affected it.

    • You need to avoid back-and-forth strokes if you want a gradation. Always start your stroke from the darkest value and move outward.

    • You can also blend in circles or back and forth, which may be the most helpful for trying to get a single area to be one value that's smoothed out, so the strokes don't show.

Tools

Now, there's also tools made specifically for this, called tortillons and blending stumps.

They're made of tightly-wound paper. Tortillons being less tight than stumps, likely hollow, and you can clearly see the layers of paper, like the tip of a grease pencil. Blending stumps are so tightly wound that the seem more like a solid chunk of the paper with a point sanded off.
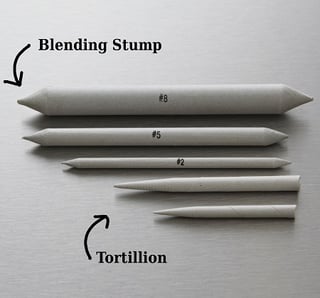
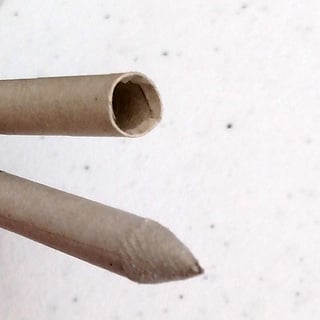
enter image description hereTortillon and stump
Left: Pic courtesy rapidfireart.com.
Right: The top is the back end of the tortillon, where you you can see how it's layered and hollow. The back end of the stump is more stump!

These give you much more precision over the blending. They come in many sizes, which makes them more adaptable than the five sizes of your fingers.

A plus to these is that as they blend, they tend to pick up more of the graphite dust in their fibers, evenly spreading it around the area and getting dust off so you don't need to use a brush or air. Your finger will end up absorbing the graphite or charcoal, but will layer it and compress it from the pressure. These can lead to you smudging dark areas of light ones accidentally if you forget to clean up.

The downside is that the tortillons don't really clean up, so if they get too much graphite built up, you'll only want to use them for matching values. To counter this, most tortillons you can purchase have the ability to peel away the outside layer. Failing that, you can use a sandpaper pad, similar to what you can use to sharpen a pencil, to rub off the rough edge.

In my experience, tortillons, both bought and homemade, tend to give a softer blend than stumps. I've made my own tortillons by wrapping up old drawing paper (possibly with a bad sketch on the inside) and taping the end seam. These homemade tortillons have given me the softest blends, as the dull point often frays.
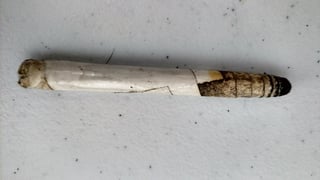
enter image description here
My homemade tortillon, not a weird cigarette. Notice the curved, feathery tip.

Here's a comparison of the four tools I mentioned, using an HB pencil:
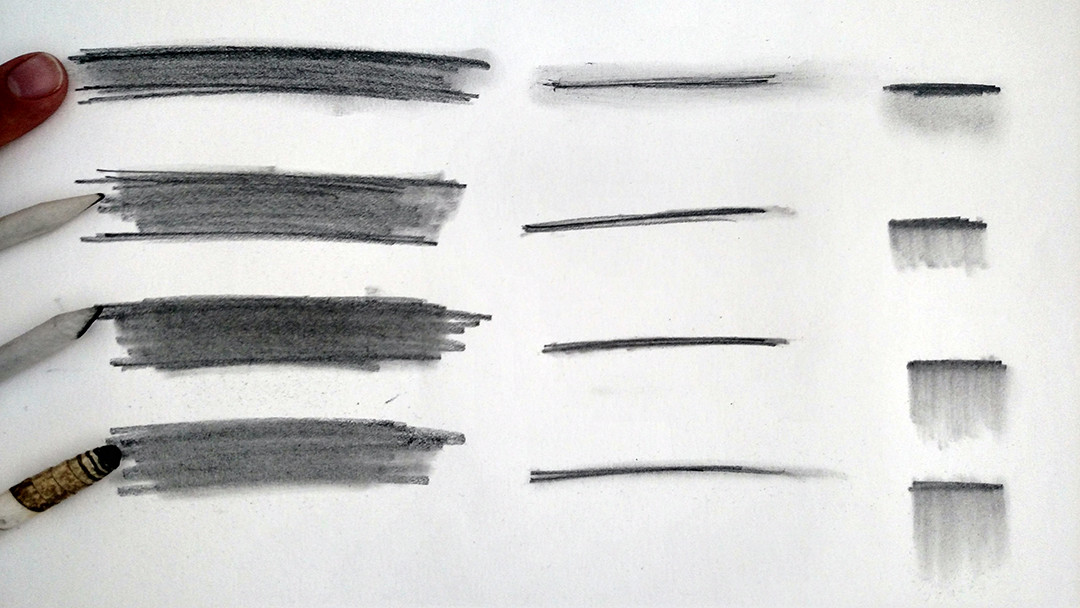
enter image description here

  • The first column is blending a solid area, mostly back and forth (not against the strokes, which would blend more evenly).
    • The stump and homemade tool hide the strokes the best, in this case.
  • The second column is a few tight lines, stroking along them.
    • Notice the finger smudged well outside it (oops!), and the others were more precise. However, the homemade one had much "fuzzier" edges, which can be nice.
  • The last column is gradating out from dark.
    • As you go down the column, you'll see each tool, in this case, was better and blending from the dark line, so there's not so much of a hard edge between the dark and light.
    • The other thing to notice is that the strokes are almost invisible on the finger patch, and much less visible on the homemade stick.

I didn't blend any two values together for this demo. You will probably not just lay down a single dark line and blend outward, like my last column. Instead, you'd create a gradation yourself by using pencil pressure and different hardness pencils, then blend those values together with your tool.

4
  • +1, very helpful! But what's the difference between a tortillon and a blending stump? Commented May 23, 2016 at 0:25
  • Updated! It's hard to see in my own photo, but the one from rapidfireart makes it more clear, re: appearances, and explained their makings a bit more.
    – user24
    Commented May 23, 2016 at 0:30
  • 1
    One part I think bears worth mentioning: Blending works better with softer pencils or graphite leads than with hard pencils. So if you're having trouble blending, try different kinds of pencils. Paper also has an influence.
    – uliwitness
    Commented May 23, 2016 at 3:05
  • Oh, and you might want to get some fixating spray, if you're not using it already, to preserve the drawing once you're done, because pencils that blend well generally rub off even more easily than usual pencils.
    – uliwitness
    Commented May 23, 2016 at 3:06
3

You can also use different grades of pencils to change the tone of the work - also known as blending (an introduction to art techniques, glossary).

To accomplish this sort of blending you use different pencil grades.

The best example of shading and tone transition that I've seen is in The Art of Pencil Drawing, by Gene Franks.

He uses an H, F, HB, B, 3B, and 5B pencil to achieve a full range of tone. Start light make the H go as hard as you can comfortably get it then pick up the F and overlap continue as such with remaining pencils and various hand positions/techniques while drawing. Practice is recommended in his instruction of achieving tone. He says, "practice this as a musician would practice scales."

Personally I use and have used as many grades as I can get my hands on. I tend to stay with graphite, turn away from the F's, and by far consider the 12B pencil to be my all time favorite. Dark, soft, hard to find.

Graphite, I read once, is supposed to be water soluble and create a sort of "water color" look to the pencil when water is applied. I've never quite got the look or hand of it. I find that a blending stump is most effective and comfortable when trying to soften up a sketch. That or my fingers.

Q-tips, erasers, water, and tortillions have been unpredictable; no matter the support.

2
  • 1
    Just a note about graphite... it is pretty much the core of all pencils, and is not water soluble.
    – rebusB
    Commented Jan 4, 2018 at 15:40
  • 12B!? I find 5B extremely soft, 12B must almost be liquid.
    – rebusB
    Commented Sep 22, 2020 at 21:56
1

My favorite for blending is graphite powder applied with a piece of chamois, available at some art stores. You can make the powder yourself by shaving a pencil lead (or block) with a sharp bladed tool or by running the lead over sand paper. I finally bought a small jar of graphite. If you want to avoid making random marks when applying the powder, the chamois should be artist quality and very thin. Not so easy to find are the small, ready-made sand blocks I have used in the past that were made for this purpose. Standard fine sandpaper would suffice. The cost for these products is minimal.

You must log in to answer this question.

Not the answer you're looking for? Browse other questions tagged .