4

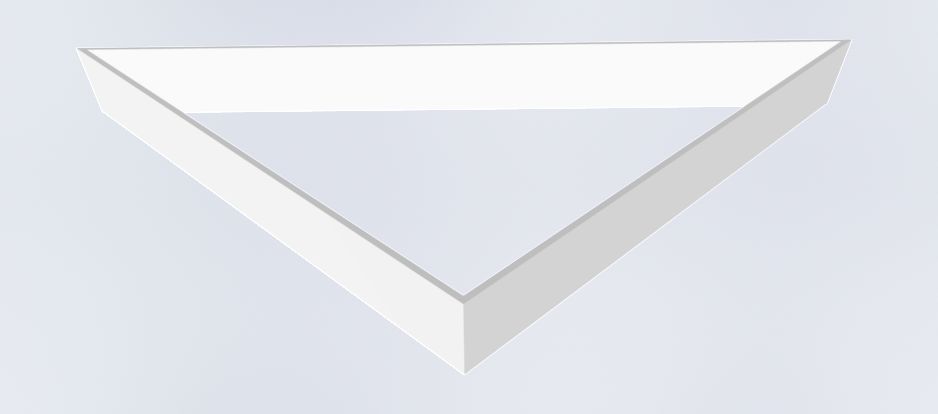
I have a great idea for a geometric lampshade that I would like to build. Think of something roughly resembling a geodesic dome. It will be made of individual triangular panels of roughly the following shape, each of which will be made of wood, with rice paper stretched across it.

![enter image description here

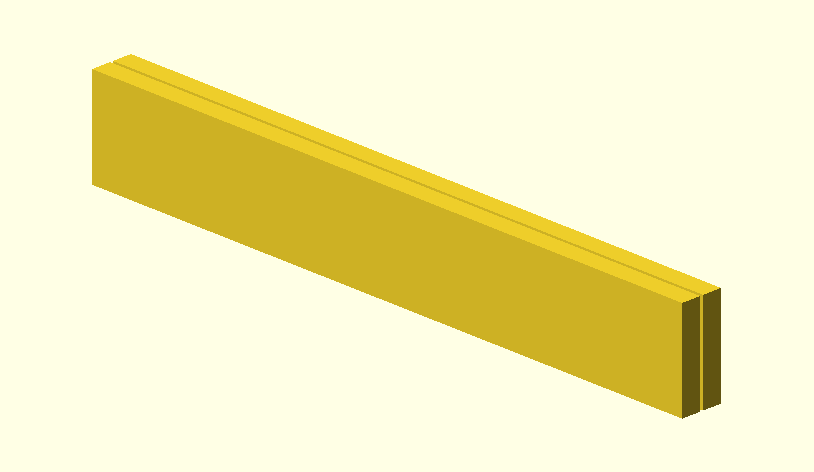
My question is about how to fasten the frames together. The frames will be made of strips of wood with a cross section of about 3mm by 15mm, which need to be attached together face-to-face, like this:

enter image description here

They can't be glued because I want to be able to take it apart again if the rice paper needs replacing.

The tricky thing is that the fastener needs to have a flat profile. If I were to drill a hole through them and use a bolt, the nut and the bolt head would cast a shadow on the rice paper. So I'm looking for a way to fasten them that will have a fairly flat profile and cast as little of a shadow as possible.

(It's kind of hard to describe how this thing will fit together, but in the above (yellow) picture the light is shining down from the top, rather than from the side, and the rice paper is at the bottom.)

So, tl;dr, I'm looking for a reversible way to fasten two strips of wood about 3mm thick, such that the fastener sticks out as little as possible from the finished piece.

It doesn't need to be super strong because it's only for a fancy lampshade, but it would be great if each fastener is easy to install, because the thing will be nearly a complete sphere and the fasteners will be on the inside, so the last few will need to be done by reaching inside it.

In case it's relevant I have only very basic woodworking skills and no fancy tools, but I can use 3D printed jigs to make cuts or drill holes in the wood with reasonable accuracy. If I don't need to make holes in the wood then it will save me some work.
5
  • BTW I wouldn't make a jig for the holes; a paper template would be plenty, with an awl to mark the starting spot (you could even use a large woodscrew as your awl)
    – Chris H
    Commented Oct 4, 2021 at 8:34
  • 1
    @ChrisH I'll be making a 3D printed jig anyway, in order to cut the wood at the right angles to make the frames, so it wouldn't be much effort to add an extra hole in it for an awl or a drill bit. I don't know the best way to make a drill guide, but anything that makes each piece easier will be worth it, as there will be a lot of them.
    – N. Virgo
    Commented Oct 4, 2021 at 8:46
  • I'm better equipped for hand woodworking than 3D printing (I only have access to the latter in work), so I'd just use my mitre saw and a ruler, but if you're printing up a mitre guide then I agree, adding a guide hole sounds good...
    – Chris H
    Commented Oct 4, 2021 at 9:03
  • 1
    ...With the printer here I'd size it to the nominal drill diameter (3.5mm clearance hole for the M3 I suggest in my answer). Then you'll need to run the drill down it to clear it because small holes usually come in a little under. If yours don't come in under size, then print 0.5mm smaller and open up with the drill. Print at 100% fill near the hole. Avoid sideways force when drilling as the plastic will cut easily. It may get loose before you've finished - either see if there's a way of duplicating the hole, print another guide, or make the drill guide a replaceable insert.
    – Chris H
    Commented Oct 4, 2021 at 9:04
  • 1
    Hot glue is reversible by re-heating it, if that's any use. Commented Oct 4, 2021 at 16:15

6 Answers 6

4

You can use screws, just the right ones, in the right places.

Countersunk machine screws will put the head flush with the outer face. I suggest M3, which I've used in similar applications. In softwood it will pull in enough that you may not need to form the countersink in advance. The inner face is a little harder but there are options. Unfortunately countersunk sleeve/barrel nuts start at M3x7, which is too long. However if you consider the line a shadow would cast, you could get away with a thin nut (half nut). These are normally used as locking nuts but in low-strength applications are fine used alone. They'd combine with an M3x8 countersunk machine screw (the length includes the head for countersunk types) giving you 2mm of protrusion. An M3 thin nut is less than that. A little trigonometry would allow you to work out how low the nut needs to be to not cast a shadow on the screen, but since your edit I reckon you could centre the fastener within the 15mm width.

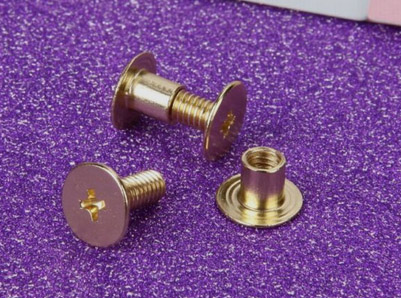
Similarly you could use screw rivets (Chicago screws) which are used in leatherworking. Note that the quoted size is the minimum length, so size slightly under you final thickness - go for 5mm in your case The outer head on the one on my belt is 1.5mm, and flat, the inner head the same thickness but slotted. Again, done up tight into softwood they'll even pull in a little denting the wood. These will look nicer on the outside.

You need a basic drill - I'd probably use my hand drill (eggbeater drill) for this as it's gentler than a power drill. You may need a countersink bit or tool, but you can get away with a larger drill bit for that in wood.

Either of these approaches would allow you to do up the last few from the outside, possibly ones that will be out of sight once it's in use, and possibly with the addition of gluing the last few nuts into place to let you get the screws started.

5
  • Those screw rivets look like a great solution to me. The trick will be finding ones of the right size that can be bought in large-ish numbers at a reasonable price, as I'll need somewhere around 130 of them. I found some randomly on Amazon that might fit the bill, but they're 6mm rather than 5.
    – N. Virgo
    Commented Oct 4, 2021 at 8:42
  • The screw rivets are also known as binder bolts and and also known as sex bolts. McMaster-Carr is a good source for quantity and wide variety of sizes.
    – fred_dot_u
    Commented Oct 4, 2021 at 9:18
  • @fred_dot_u here, those terms more often refer to bigger/longer types (furniture sizes, often with a screwdriver interface on both parts).
    – Chris H
    Commented Oct 4, 2021 at 9:32
  • It might be possible to use the wood, itself, as the nut. Drill a pilot hole, then saturate the hole with low viscosity super glue. When the glue hardens, use screws designed for assembling plastic parts. These are flat head screws that have a very coarse, sharp thread, designed to cut their own threads in the plastic.
    – fixer1234
    Commented Oct 4, 2021 at 17:04
  • @fixer1234 possibly, but I'm wary of things like that when it's designed to be taken apart again (e.g. a bubble of glue doesn't dry as fast as you think, and the screw isn't coming out without breaking something, or just glue stains on the surface)
    – Chris H
    Commented Oct 4, 2021 at 19:22
3

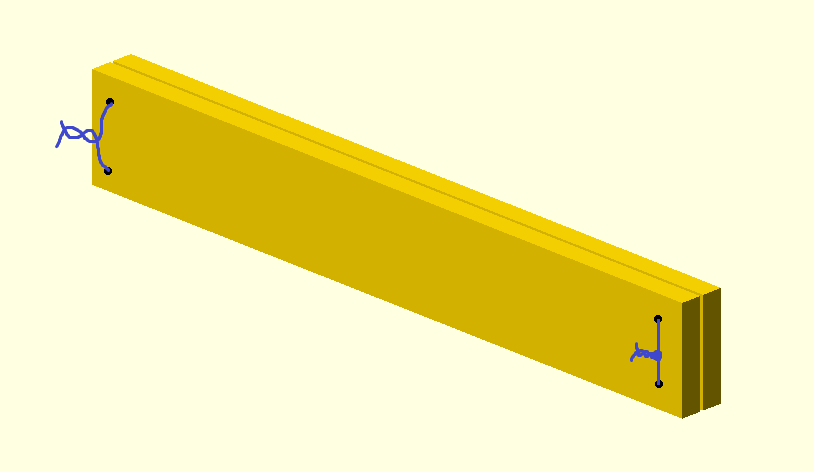
It might sound crazy at first, but consider "sewing" them together. The same principle is used in (traditional) book binding, where several pages and covers are sewn together. Only in this case I would use thin wire and twist the ends to tighten it instead of using thread and tying a knot.

enter image description here

Pros:

  • very low profile; press the twisted end against the wood to avoid shadows
  • easily reversable by cutting the wire
  • Needle nose pliers help your work in spaces where your hands wouldn't fit.

Cons:

  • You need to drill a lot of holes very presicely
  • Light will shine through the holes if they are too big
  • Thread can easily rip while tightening the knot. Some materials like nylon thread can stretch over time. I suggest using wire or tiny cable ties (if they fit).
1
  • Thank you for this suggesion - I've considered similar ideas and might go with something like it. The light won't show through the holes, as the light is shining from the top in this picture, rather than the side. (Sorry that wasn't clear, I've edited the question.) It might work with just one hole per twisted wire, which has the advantage that I could put the twisted part at the top where it won't show, instead of at the side. Cable ties are not a bad idea, if I make the holes big enough for them. Drilling all the holes will be laborious, but I can make a jig to get them in the right place.
    – N. Virgo
    Commented Oct 4, 2021 at 8:16
3

Hold the slats together with "U-channel" binder strips. These are plastic channels typically used to bind reports by sliding them onto the edge.

enter image description here Image courtesy Amazon

A pair of 3mm thick slats plus the rice paper will be approximately a standard capacity (1/4" on the US version) for these binders. They can be cut to length, or several positioned next to each other for long runs. They apply enough pressure so that something like a lamp shade will stay together.

This approach doesn't require drilling any holes and leaves a finished appearance. You can take them off to repair the rice paper and then reassemble it. Black and white are commonly available colors, but you can find them in other colors if you hunt.

They won't last forever, though. After maybe a decade, the plastic can become brittle and they can crack. So if you need the shade to last forever, you would want to periodically inspect it for any cracks and maybe plan on replacing the channels prophylactically every 5 years or so.

3
  • This is not a bad idea! Small metal fold-back clips might also work, and might last longer. (By fold-back clips I mean the things that are also called butterfly clips, the kind with a metal handle that you can remove.) If I can get those in the right size I might try them, as they're very easy to apply and won't need any holes to be drilled.
    – N. Virgo
    Commented Oct 5, 2021 at 7:16
  • 1
    @Nathaniel you can get those clips in almost the perfect size for this. I've bought a couple of boxes before (probably ebay)
    – Chris H
    Commented Oct 5, 2021 at 9:17
  • @ChrisH I found exactly the right size in the 100 yen store! It seems like this might work.
    – N. Virgo
    Commented Oct 5, 2021 at 13:55
3

I think I would use the so-called chicago screws. They are not countersunk though, but it will be simpler then common countersunk wood screws because for the countersunk (self-tapping) screws you will still have to drill precise holes and then extra drill the deepening for the head, which is not as easy as it seems. For the chicago screws you just drill a hole once and don't need to be super precise. Removing afterwards is also easy if you don't tighten them hard.

Chicago screws are available in all possible sizes and you could even find some with realy thin head profiles, check on aliexpress for example.
E.g. here is an example with a very low profile head:

enter image description here

1

First of all, build some jigs.

1). make a jig to hold each strip flat against the bottom like the blade of a hand plane but with an attack angle of 45 degrees. Allow the edge of the strip to protrude downward from the skate of your homemade plane just enough that the top most edge of the strip is level with the plane of the bottom. Then apply your wooden bladed hand plane to a hard-surface mounted sheet of sand paper until the protruding edge is sanded away. Repeat this for both ends of every strip. This should leave you with beautiful mitered faces like the ones shown in your drawing.

Glue set of three strips into your triangle shapes using wood glue and painters tape as clamps. Once they are dry, you can build your second jig.

The second jig is just a larger triangle, built the same way as those which you just glued up, but made of thicker wood. The inside opening of this larger triangle should be just big enough to allow one of your new triangles to slide inside. This second jig should be mounted on a stable surface such that one of its equilateral faces lays flat against the base while the other two standing upright such that the pointed/mitered joint between them is at the top. Into this top point, we will want to cut a groove in the middle of each side, perpendicular to the plane of the base and parallel to the length of the bottom side. I hope that makes sense as this isn't easy to describe. What I am trying to set up is a saw guide which can be used to consistently cut spline channels into all three corner faces of each of your triangles. The inner walls of this jig's encompassing triangle should hold your project triangles steady as you carefully saw each channel.

Once this is done, you can cut small triangles out of an appropriate thickness of wood and glue them into these channels as corner splines. Here is an article that describes the idea of splines better than I can. It's target shape is a square box, but the idea is the same. The jig described in that article has the corner facing downward which works well with tablesaws. The jig I described has the corner facing upward which works better with handsaws.

As a bonus of this technique, the flat surface of the spline material which protrudes into the interiors of each corner of your triangles could provide a great surface to attach/glue the rice paper to.

2
  • This is very useful, though it seems to be more about making the frames than about attaching them to each other. I'm planning to 3D print the jigs in order to get all the angles right. I'm hoping that glue will be enough to hold the frames together, without splines, as the rice paper will provide some reinforcement. The geometry should make the whole thing very stable once it's all assembled, so each individual frame won't be subject to much in the way of mechanical stress. I might try splines if that doesn't work out and I'm feeling adventurous! (But it's a lot of work - there are 46 frames.)
    – N. Virgo
    Commented Oct 5, 2021 at 7:23
  • 1
    Sorry! I totally misread your question. Off the top of my head, I would use your 3d printing skills to join the separate frames together. If the geometry linking the triangles together is consistent throughout the structure (cylinder/dome) then a few 3d models could be printed, each many times to fill that needs, linking two triangle faces at exactly the desired angle. These 3d parts could attach to each face through a consistent hole or slot cut in the face's surface, or by holding onto the edge of the triangle like a clamp. The nice thing about this approach is that it is replicatable. Commented Oct 5, 2021 at 14:48
1

Magnets or velcro.

Both are easily removable but strong enough for a lamp shade. And better yet, both parts can be made to be invisible from the inside!

For the magnets, you can buy thin round magnets and then just use thin strips of metal. The best part of magnets (in my mind) is that you can use a jig to prepare all the side pieces the same; each piece would be interchangeable. See the ASCII art diagram below for my thoughts...

____________ ... _______________
|                   _______    |
|    O             |_______|   |
|___________ ... ______________|

So the O is a flat bottom hole "drilled" using an endmill (using a regular wood bit would work too, but lots of care needed on depth). The hole need NOT go all the way through the piece! Then you would use a router at a very shallow cut to remove only a little more depth of material than whatever metal strip you have.

In the case of velcro, just do the routing part on the middle of each side piece. and instead of classic velcro maybe use some of the 3m style that both sides are the "hook" part of the velcro but can be "snapped" together. That way all pieces are the same and can be rotated and you don't have to worry about matching the female/male (aka hook/loop) of the velcro.

1
  • Second the magnet solution. These guys have small magnets that could work...
    – BobT
    Commented Oct 7, 2021 at 13:58

You must log in to answer this question.

Not the answer you're looking for? Browse other questions tagged .