5

I've been using these molds (below) to make bricks for HO scale models. I've had pretty decent results using hyrdocal, with one issue. For a long time I couldn't get the mold flat enough, and the product was bowed. It was a problem because the walls I made as a result were not straight, but curved. I solved this by placing the molds, once filled, on one sheet of plexiglass. I then placed another (heavy) sheet of plexiglass on top, sandwiching them. This solved the bowed molds problem and introduced a new one. enter image description here (Mold is approx. 3 inches by 6 inches)
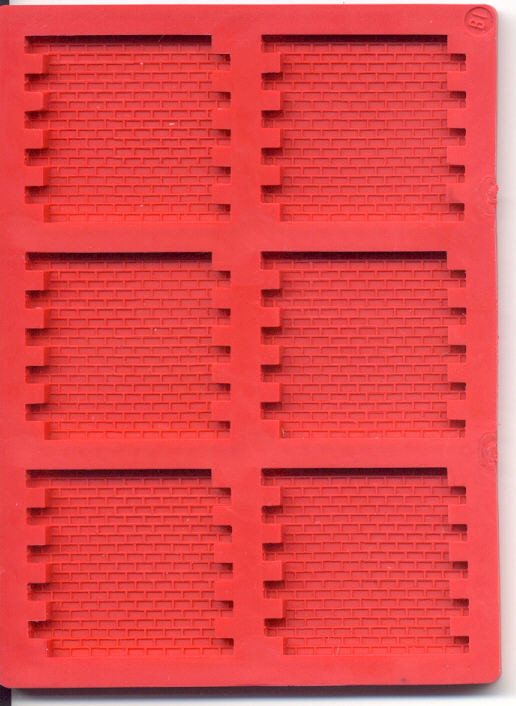
Now, I can't seem to fill them the proper amount. What is ideal? They either come out with too little plaster, and so they are weak and the tabs break off too easily. Or, I overfill them and there is a sheet of dried plaster over the entire mold. It flakes off easily when it's set but it makes the molds a total pain to clean.

How should I be applying plaster to these to get the just-right amount?

4
  • I'm guessing flexible silicone ?
    – Chris H
    Commented Jun 27 at 6:01
  • Some proprietary plastic/rubber material
    – nuggethead
    Commented Jun 27 at 10:40
  • When you say the molds are hard to clean if you overpour, do you mean the molded pieces are hard to clean up, or the silicone¹ mold is hard to clean? If the latter, perhaps it would help to "paint" the surface closest to the camera with a coat of something like petroleum jelly, prior to pouring? (Note 1: I bet it is silicone, especially if it's flexible enough to need the plexi base. Do "proprietary plastic/rubber" substances even exist, really? Maybe if 3M itself has gotten into the direct hobby-mold manufacturing game on a lark...)
    – FeRD
    Commented Jun 28 at 7:34
  • When I say hard to clean, I mean that the molds have plaster over the whole top surface. It hardens and remains after I have removed the pieces
    – nuggethead
    Commented Jun 28 at 12:10

5 Answers 5

7

What I would do:

  1. Drill holes in the top plexiglass so that there is one hole per part in your mold.
  2. Fill each mold with plaster until it is almost full but does not overflow.
  3. Place the top plexiglass on the molds.
  4. Pour additional plaster through each hole to fill the molds completely.
  5. After demolding, while the plaster is still soft, scrape the excess plaster from the holes with a knife.

This way, you will have a two-part mold, and it should solve your problem. The size of the holes is important: if they are too small, you may have trouble filling the molds completely; if they are too large, you will have more post-processing work. Experiment by starting with smaller diameter holes.

1
  • Hopefully any bubbles against the bottom of the top sheet will be small enough not to matter
    – Chris H
    Commented Jun 27 at 10:42
5

The first answer that comes to mind requires a bit of experimenting and also requires that your mixture be consistent in terms of water content.

You'll need a gram scale with the capacity to hold the mold and view the display. Tare the mold, pour the amount you think is correct and note the weight.

Repeat the above, increasing or decreasing the amount according to the results of the final product. Use that amount to fill each cavity in subsequent pours. You could also create a container in which to pour the weight acquired from the above tests, but it may be necessary to adjust for the material that would remain in the container after each pour.

1

Getting the mould to lie flat during the pour should allow you to gauge the fill by eye.

I would avoid moving it while full, so first place it on your base sheet. The first thing I'd try - but I assume this won't work from the fact you're having trouble - is just underfilling all the compartments so the weight of the plaster is even, then topping them up.

If that's not enough weight, a frame to hold it down would be needed. At that point I'd probably make top and bottom frames of wood, and use machine screws with wingnuts to clamp them together at the corners (like a flower press, for ease of getting it open). You'd probably need a frame that went all round, plus up the middle. Multiple frames could be stacked for drying several moulds at once.

1

I am reading this as a volume question: how do I mix just enough plaster to fill the molds, but not too much to produce waste.

If that is the case, experiment with rice first. Pour rice in to the molds until the molds are full of rice. Then pour the rice from the molds in to a container to measure the volume. Remember that hydrocal does shrink as it dries, so you will want to mix just a little more - start with 5% more mix than the volume of the rice and adjust with experience.

1
  • 3
    Wouldn't something more fine like sand or salt or flour be better than something inhomogeneous like rice? For that mtter, could even try a liquid? Commented Jun 28 at 8:25
1

Something to add for your project, if you haven’t already, is to apply a release agent to your molds first, which can be using a aerosol release for plaster and concrete projects. You'd spray a small amount onto cheese cloth, lightly covering the surfaces of your mold and plexiglass, as this will keep any residual plaster material from adhering as it dries. This will give your casts a more defined finish.

Also pouring continuously to fill the molds completely then setting your plexiglass over to obtain true scaled dimensions.

1
  • 1
    I've never seen or heard of cheeese cloth used like this. Wouldn't it get stuck in the wet plaster despite the release agent? A quick search didn't yield any useful result. Can you please elaborate on this idea and how it works?
    – Elmy
    Commented Jul 1 at 19:54

You must log in to answer this question.

Not the answer you're looking for? Browse other questions tagged .