I'm really getting tired of repeatedly having to measure out and draw guide and slope lines for lettering or calligraphy with a ruler. Is there a faster, easier, more consistent way to do this?
-
Doing a little research and I was wondering what would be wrong about making master templates and doing faint copies of your line guides?– MattCommented May 14, 2016 at 3:13
-
@Matt. Because you may be lettering at different sizes for different pieces, or lettering different styles that need different ascender/descender heights, or different slanting angles. It's not always about being uniform.– inkistaCommented May 14, 2016 at 5:34
-
Why did you delete your answer? That is what I would have answered based on your question– MattCommented May 14, 2016 at 14:00
-
@Matt, I'm holding it in reserve. I wanted to give a few other folks a chance to answer. Asking the question, then answering it myself only three hours later felt a bit like stacking the deck. :)– inkistaCommented May 14, 2016 at 17:10
-
1It's fine either way. I know we all have more questions but need time or don't consider them good. Simple ones are going to be asked anyway either by us or someone else. We all need more rep so you motivation is admirable– MattCommented May 14, 2016 at 17:16
2 Answers
Note: This is a more expensive, albeit an efficient method.
Requirements:
- A bright lightbox, or lightpad
- A grid printout
An alternative would be to get a lightbox/lightpad, and place gridded paper beneath the sheet you are drawing to. When illuminated, the grid should be visible through your worksheet (this depends on the brightness of your lightpad, and the thickness of the paper you are writing on).
I have tested my own lightpad with 300gsm watercolour paper and it shines through quite well (it's a Huoin, though there are similar products available on Amazon. Make sure your lightpad is bright enough to shine through your desired paper! My lightpad's brightness is advertised as "1758 cd/ m2, luminous flux: 1800~2100 mcd".)
The grid that you use will depend on the size of the letters and your choice of calligraphy style. A quick google image search for "calligraphy grid" yields plenty of useful grids, including italicized grid lines for italic scripts. A simple printout of the grid is all you need, printed at the scale you like.
This method allows you to work at a faster pace, and reuse the paper grids again and again.
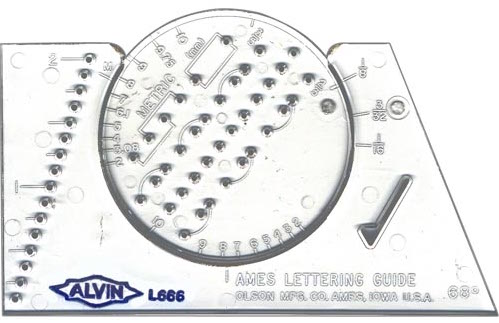
Make sure you're using a straight-edge table, and get yourself a T-Square, and an Ames lettering guide.
The wheel on the Ames lettering guide rotates, so you can adjust the size between the lines, and the different hole sets account for different ascender/descender/height spacings for different styles of lettering.
Make sure your paper is taped down, and straight with regards to the T-square (in a pinch you can use a ruler), and then simply put your pencil in the appropriate holes, and slide the letter guide across the t-square's edge. Sliding the T-square up and down along the desk edge lets you do different sets of lines quickly and easily.
The Ames also allows for drawing slant lines at 68º. For other angles, you can use drafting triangles, either fixed or adjustable.
See also: http://www.thepensivepen.com/2013/12/guidelines.html#scales
-
It's really, really hard to figure out how to use an Ames lettering guide based on text descriptions. Try to find a video, or better yet, a real live teacher. But once you get the hang of it, it really works.– MarthaCommented May 25, 2016 at 0:17
