2

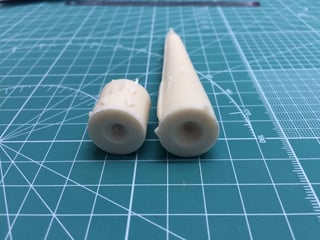
I'm working on a rocket model made of resin. There are two parts I need to adjust and then glue together: one part is a cylinder and the other a cone. (Actually, I've got to do this four times to get four boosters.)

I'd like to be as precise as possible here and wonder how I can make sure the sides I'm sanding are leveled. Are there any tricks when sanding a cylinder to ensure the "top" isn't going to incline?

The problem is that these parts don't have smooth sides so I can't for example stick them into some tube.

Here are the parts I need to adjust. I drilled holes into the side I need to sand to make sanding quicker (since they're going to be glued together you won't see the holes). The parts I need to sand

Click to enlarge image

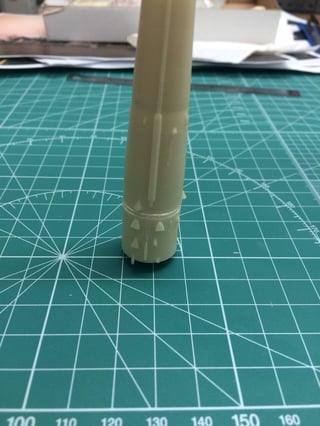
Here's how they are going to be glued together.

How the parts are going to be glued together

Click to enlarge image

7
  • 1
    If I understand correctly you are trying to avoid this? Should be easy for a true cylinder but you have on conical one there as well....
    – Matt
    Commented Mar 7, 2017 at 17:02
  • @Matt: Yep, that's exactly what I want not to happen! :-)
    – DarkDust
    Commented Mar 7, 2017 at 17:35
  • Do you have access to a lathe or a table saw? Commented Mar 7, 2017 at 18:10
  • @HenryTaylor: Unfortunately I have neither. A table saw would be too imprecise, I guess: the parts are about 1.8cm/0.7in in diameter. A small table-top lathe may indeed be a nice tool to have.
    – DarkDust
    Commented Mar 7, 2017 at 20:04
  • I wonder if a jeweler's saw would work....
    – Catija
    Commented Mar 9, 2017 at 18:39

1 Answer 1

1

If you have access to a table saw, you can place the cylinder against the miter guide and carefully advance it into the blade.

For a non-power-tool related option, a hand saw miter box will provide similar, perhaps easier alignment. The typical hand saw will chew up the ends of the cylinder, but here's the good part. Use rubber cement to attach a sheet of sandpaper of desired grit to the side of the saw blade.

It may be necessary to shim the cylinder to place it higher than the saw blade teeth. As you press the cylinder against the front or back of the miter box, you'll also apply pressure toward the sandpaper coated blade. Rotate the cylinder as you sand to avoid irregularities caused by the fore and aft motion of the saw.

It helps if you have three hands and especially if you bolt or otherwise clamp the miter box to a solid surface.
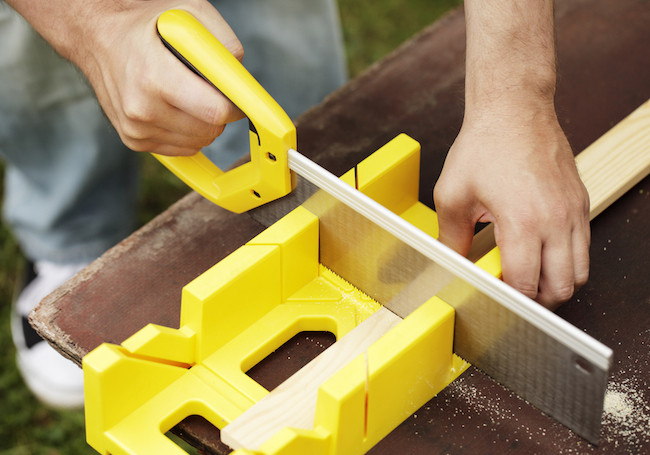
miter box in use

Depending on your skill set, you can construct your miter box, buy a kit or purchase from retail.

I have a hobbyist grade milling machine. I can clamp the cylinder in the vise, true it up to a few thousandths of an inch and mill the end true. That's overkill, and also a power tool option.

A good disk sander will have a miter guide and will be true to the disk plane, but again, expensive power tools may not be your best selection.

If you have the ability to drill a hole to match your cylinder squarely in a piece of wood, you can insert the cylinder and shave away the off-true portion with a plane, or use a sanding block. This last option is the least-tech, least-equipment method one can use, I believe.

EDIT:

Another glance at your images shows that the protrusions on the cylinders may cause some out-of-true results. If you have a continuous line on the side of the cylinder to use as contact point for the miter box, the chance of success is higher. For a miter box to work, you'd have to have two lines clear, ninety degrees apart.

For the hole-in-the-board method, you could get away with slicing into the edge of the hole clearance slots for the protrusions. The remainder of the hole's edges would provide the support and alignment needed for a good result.
2
  • Thanks for the answer! I guess the techniques may be too coarse (sorry if I get the terms wrong, I'm not a native speaker). The parts are small: about 1.8cm/0.7in in diameter. The hole-in-board-method is a very interesting idea, though. The "noses" on the parts will make it tricky to fit, but I might be able to do that using shims.
    – DarkDust
    Commented Mar 7, 2017 at 19:57
  • using shims is a good idea, especially if they are uniform thickness and are of sufficient length to fill the entire depth of the hole. That will better ensure the alignment of the cylinders to the perpendicular. You can also use the same hole as a gluing jig, to keep the two parts properly placed while the glue cures. If you like my answer or consider it the best solution please click the appropriate check marks.
    – fred_dot_u
    Commented Mar 7, 2017 at 23:09

You must log in to answer this question.

Not the answer you're looking for? Browse other questions tagged .