6

I have 36" of Aluminum 6061 square bar (5/8"x5/8") that I am trying to cut into uniform I-shapes shown below where two parallel 2" x 1/8" x 5/8" sections are cut from the long sides of each 2.5" piece. enter image description here
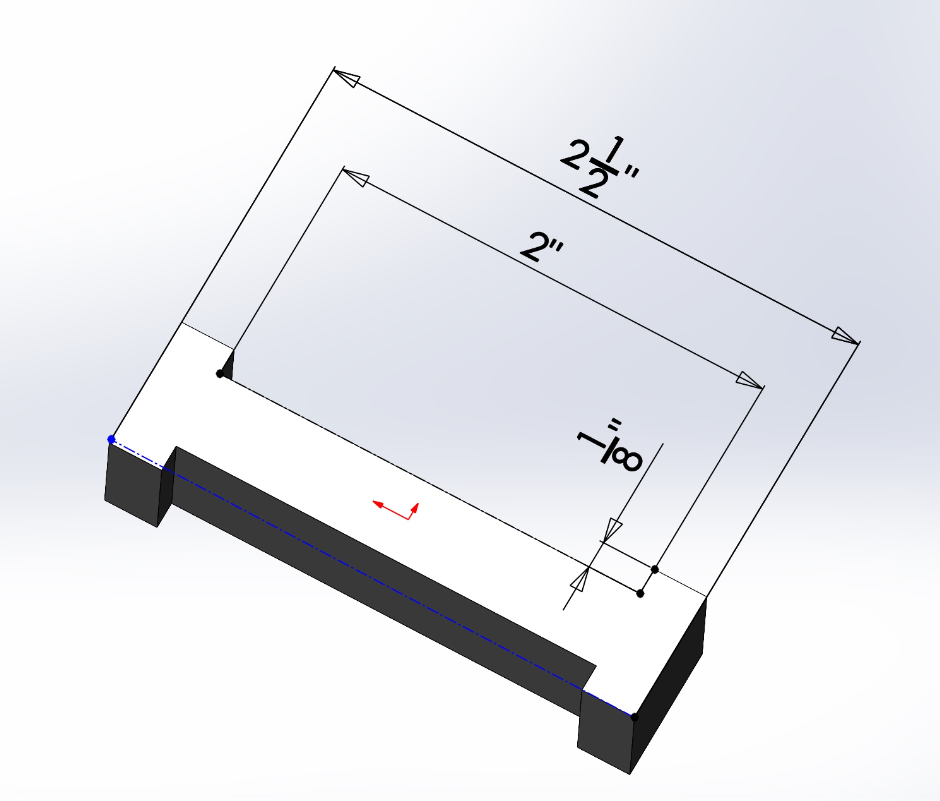
I have read online that the most accurate method would be to have a long bar that matches the wider dimensions (2.5" x 5/8") and running it through a CNC mill to cut it in to the uniform shape, then cutting it in to 5/8" sections. Unfortunately I do not have access to such a large section of aluminum nor a CNC mill.

I have access to:

  • Vertical bandsaw
  • Drill Press
  • Hand drill
  • Miter Saw
  • Bench Grinder

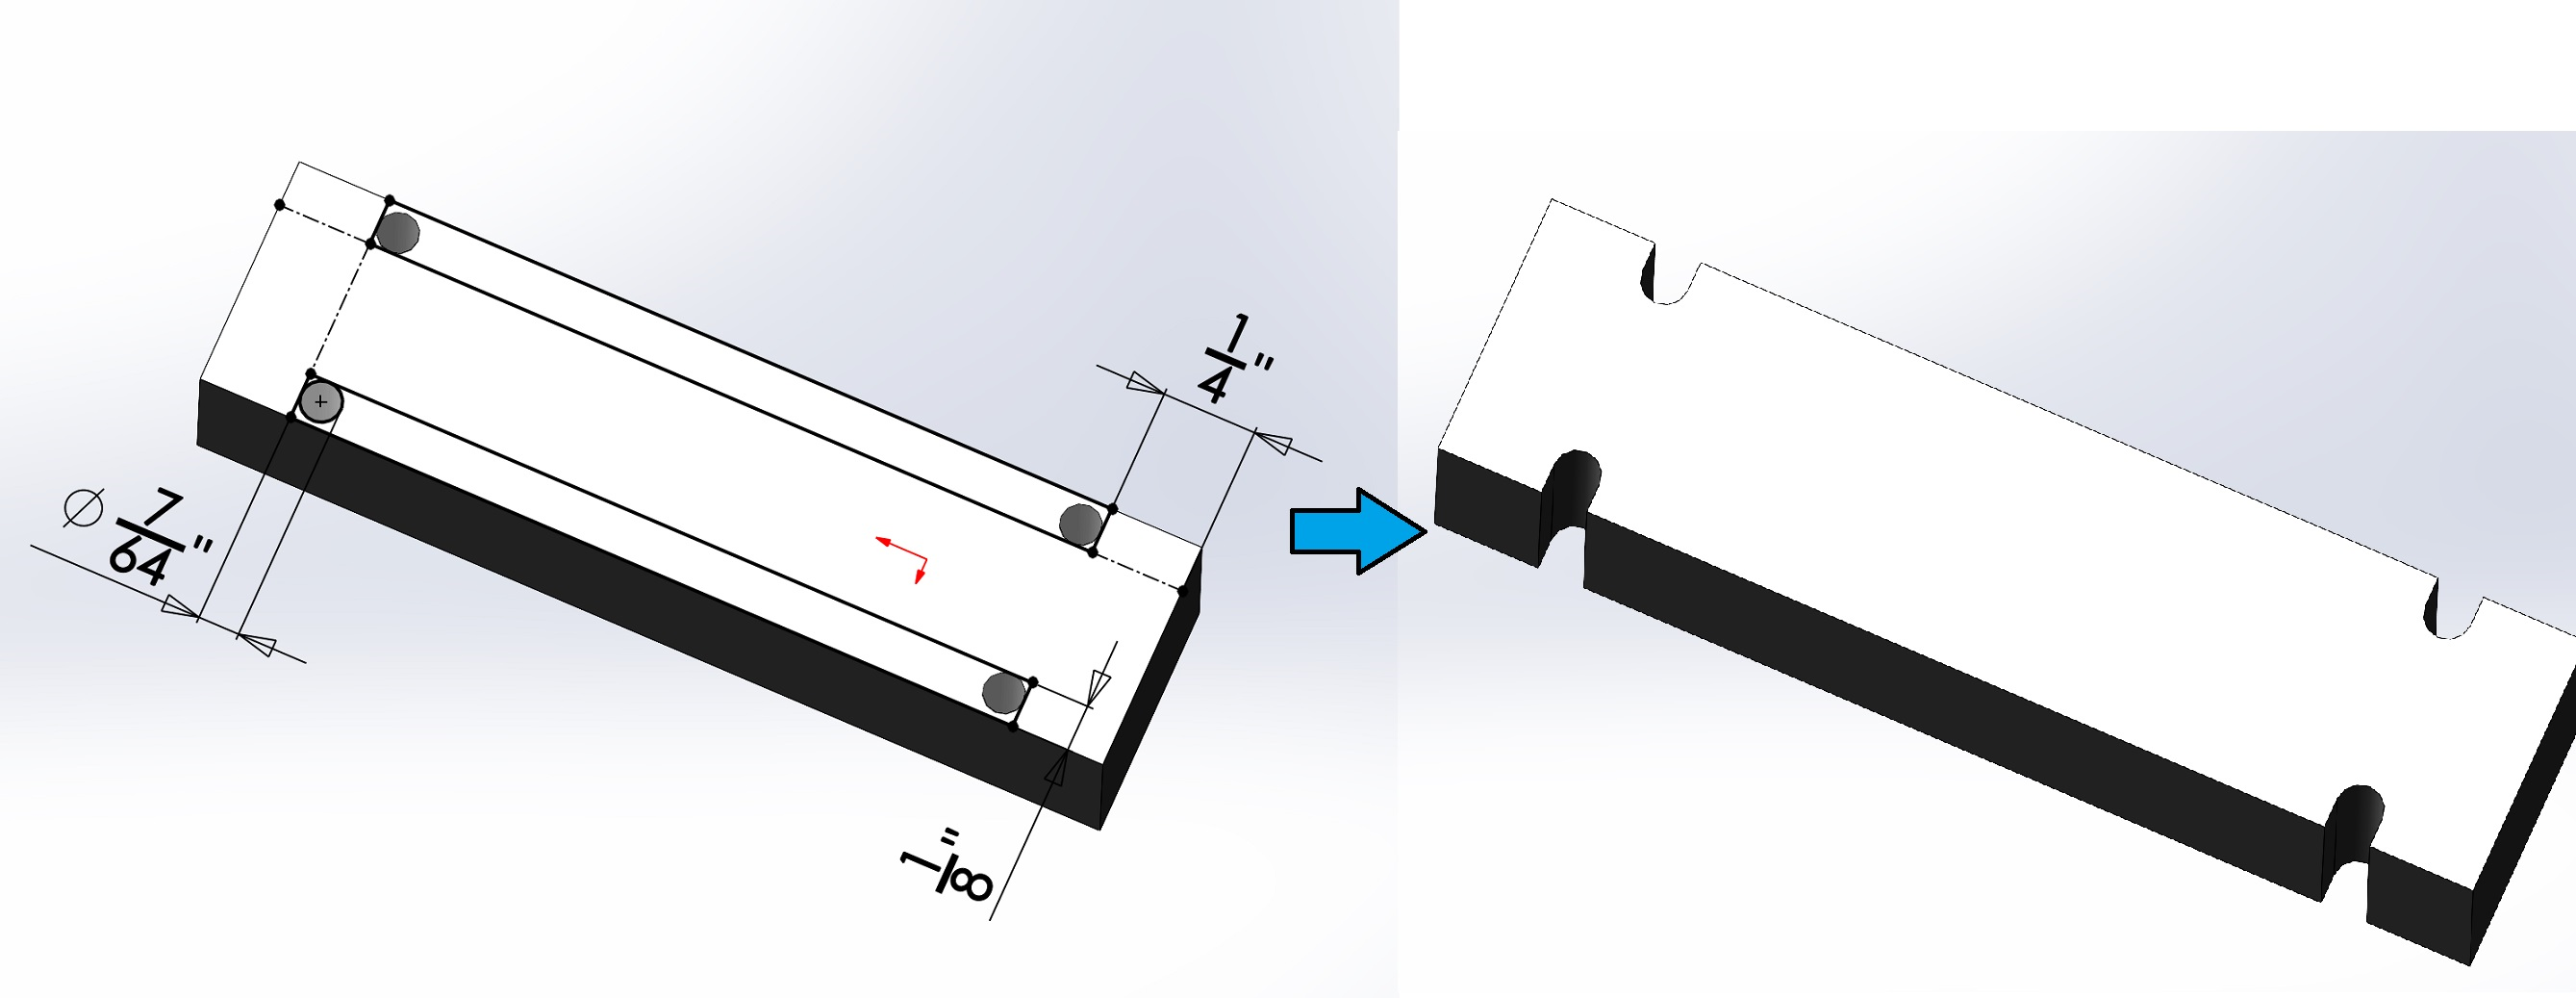
I was thinking the most straightforward albeit lengthy (and inaccurate) process would be making four cuts from the outside towards the center, then drilling four holes into the side using the drill press with a 7/64" diameter bit then making another cut to remove any remainder material as shown below: enter image description here
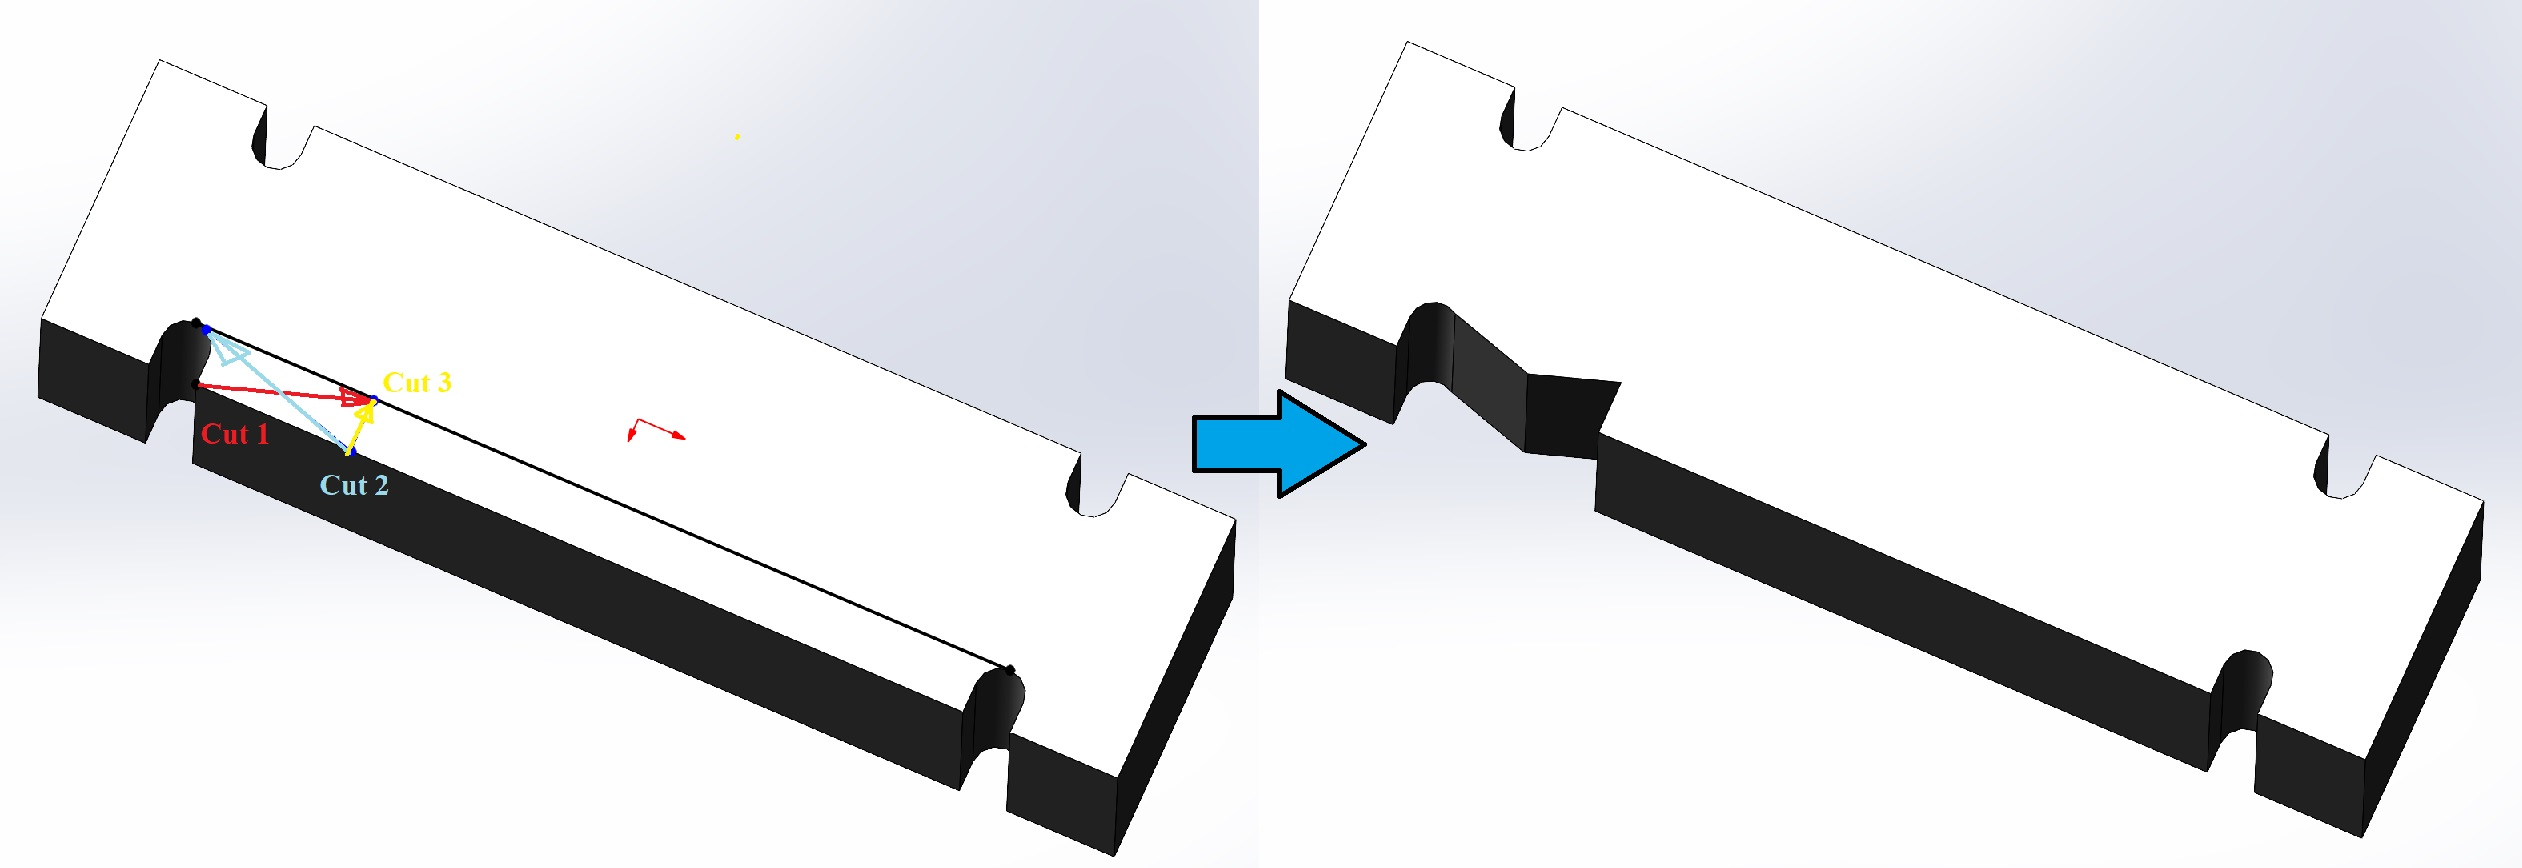
I would need to follow up with either diagonal cuts into the grooves because my bandsaw blade is 0.5" wide from teeth to flat side, so it wouldn't fit flush against the inner plane yet to do cut the long dimension. I think I would have to do additional cuts to get more material out of the way to cut it flat. At this point the drilled holes seem sorta unnecessary, but I wouldn't want to risk cutting deep into the finished product right at a corner (stress concentration point) with the diagonal cuts (mainly cut #2). That would result in something like below:

enter image description here

I could try to clean away that last triangle to get a flat surface with additional cuts or a file then I could make the long cut along the length of the bar.

This process seems extremely tedious and probably illustrates my inexperience really well-- is there anything else I can do with the tools I have to make this more efficient and repeatable? I will need to process at least 20 of these for the parts I need. Unfortunately there are no metal shops for small jobs where I live, and purchasing from another state costs almost as much in shipping and handling as the parts themselves cost in material and labor, both of which are in the hundreds of dollars range.

Ideally I would like very flat and parallel surfaces, but with the steps outlined so far each side is going to have at least one triangular lump that is difficult to file down. Would a jigsaw with a metal cutting blade help with cutting straighter down into the aluminum? Or maybe a compact angle grinder with a very small diamond blade to start the cut from the top? Even after reading about tools for different metal cutting applications I can't find any that really suit this particular cutting job besides a CNC mill which is thousands of dollars at a minimum.

1. How can I improve/change this process?

2. Would I need additional tools for this project?

I would be willing to spend $200-$300 on a new tool/bit set.

Thank you in advance for any advice and input!
5
  • 1
    There probably are machine shops that would take this on, even in quite small places, but they can be very hard to track down. It's possible they have no online presence at all
    – Chris H
    Commented Jun 27, 2022 at 12:12
  • 2
    With limited facilities, I tend to consider this sort of thing at the design stage. So for example make it out of 3 pieces bolted together; each piece is then a cuboid. Without knowing your application I don't know whether that would be suitable, but it's as well to consider manufacturability up front
    – Chris H
    Commented Jun 27, 2022 at 12:16
  • 1
    You wouldn't need or necessarily want a CNC mill, a simple manual mill would make short work of this. The machinist could clamp a number of bars together and mill them off in one operation, flip and do the other side. Commented Jun 27, 2022 at 18:14
  • Might want to specify the acceptable radii for the inside corners. Commented Jun 27, 2022 at 23:41
  • OP, what did you end up doing, and how did it work for you?
    – Criggie
    Commented Oct 30 at 1:15

3 Answers 3

9

Don't overestimate the difficulty involved in filing aluminum. One can nearly sculpt aluminum into any shape in a very short time, using a sharp file and a file card. It is even practical to use only a file to create a single unit, but not 20, of course.

An angle grinder will either break the cutting disk or clog nearly immediately; reject that option.

I have a hobbyist mini-mill, not CNC. It would be somewhat tedious to cut 20 pieces, but not overly so, as your requirements are straightforward. There's no user-to-user communications on this resource, but this is something I'd take on at hobby prices. You may want to broaden your search into mini-mill forums in which you'll find agreeable hobbyists willing to take on your project as a lower cost option. If you do so, you'd want to specify tolerance of the dimensions. For example: do you need 1/8" (0.125 inches) to plus/minus 0.001 inch tolerance? Would you provide the raw material, as you've noted that you have the bar? Less expensive to ship if it's cut to length, even if slightly oversize, using a hacksaw. Aspects of this sort also apply to your own work efforts.

I believe that you could use a hacksaw with a new/sharp blade, (lubricate the blade when in use), an equally sharp file with a file card (I'll have to research lubing a file) and perhaps the drilling as you've suggested. I reference the lubrication, as a file will quickly clog with aluminum, reducing effectiveness. The file card may not keep the teeth as clean as desired. WD-40 and kerosene are common lubes for aluminum machining.

Your miter saw (electric?) is a good choice for cutting pieces to length, as it will provide more squareness to the cuts. If you have access to a sliding miter saw, you can also set depth-of-cut to your requirements. Additionally, creating the depth-of-cut at the edge of the piece as noted and sliding the work to cause adjacent cuts will remove the triangle of concern.

Note, however that the precision available on a sliding miter saw is limited by the flex of the depth-of-cut mechanism. You could mitigate this by applying "excessive" downward force to achieve the desired depth. Once completed, filing could return a uniform depth over the surface.

The vertical bandsaw also provides the equivalent capability, as long as you can be certain to limit the depth of cut and to provide appropriate guide on the outside cuts. Making cuts that leaves the appearance of a comb, then cutting away more and filing away the remainder is common in the hobby world, at least my hobby world.

3
  • 2
    Incredible, thank you for such a detailed, insightful answer! Thank you for the warning on the angle grinder, I will not go that route. I will try to search for local hobbyist forums, but unfortunately since the population of my state overall is relatively low compared to others I haven't been able to find one so far. If I may ask, what was the cost of your mini-mill including necessary accessories? Understood, I will use my miter saw for the 2.5" sectioning cuts. Ah, I have seen that technique used for woodworking. Thank you for the reminder, I did not think of applying it! Commented Jun 27, 2022 at 1:17
  • 1
    I've forgotten the cost, but there are many variations of this mini-mill from mid-level distributors to the warehouse type (HF) with prices around both sides of US$1000, depending on accessories. I purchased a turnkey system with clamps, collets, mills, etc, while a bare system would be less. I suggest the forums, as shipping from a hobbyist isn't going to be problematic. Finding a hobbyist to help wouldn't be regional.
    – fred_dot_u
    Commented Jun 27, 2022 at 8:18
  • 1
    One resource you may find useful is groups.io/g/Mini-Mills/topics which also allows peer-to-peer communications. Note that my username there is identical to this one.
    – fred_dot_u
    Commented Jun 27, 2022 at 8:24
1

I'd be tempted to drop money on buying a milling machine and use a 2 flute endmill to cut the end slots, then rough out the middle with a coarser endmill, and finish to size with the first endmill.

Risks - the aluminium stock you have is likely to bow as you remove significant material off each side. So avoid doing all of one side first. Try taking a pass off each side in turn to keep it somewhat balanced.

You'll also need a good-sized machinist vise or some way to clamp the part to your machine's table.

Downside, this solution blows your budget by a factor of 20. So is only practical if you're going to do more work like this.


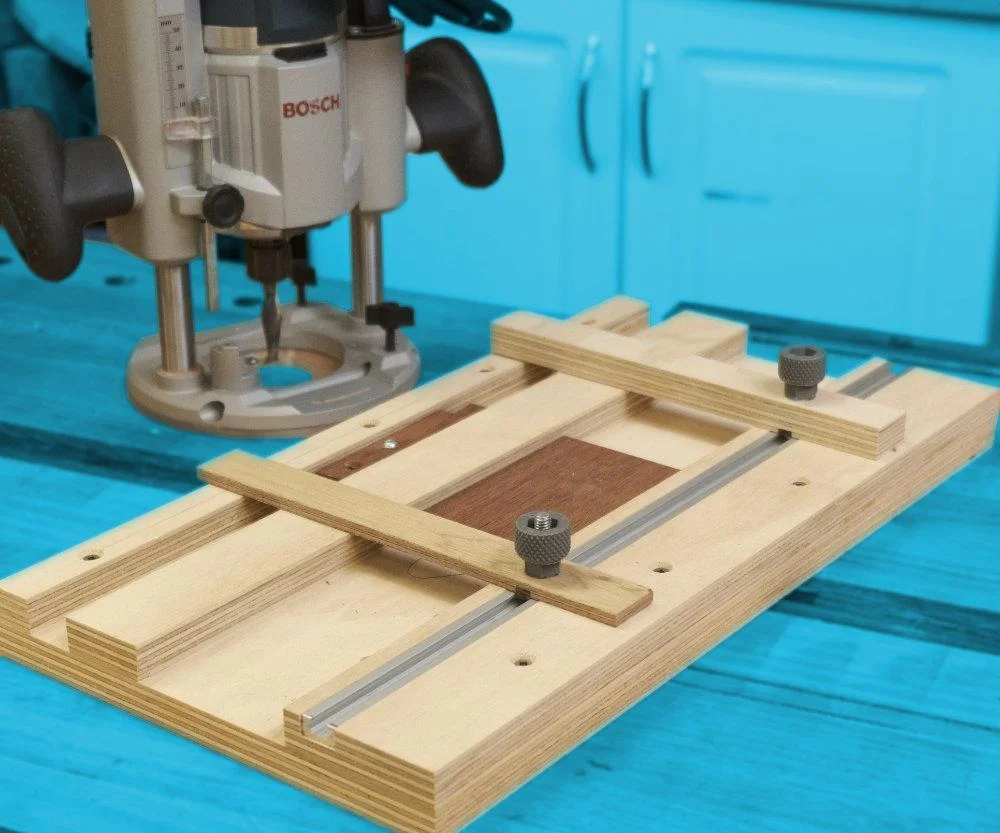
As a less-technical solution, one could make up a jig from scrap wood to control and limit the motion of a plunge router.

Remember aluminium cuts acceptably well with woodworking tools, so a carbide router bit may be all you need to achieve acceptable accuracy. Take 3-5mm off per pass and see how the motor handles it.

Flip the part each pass so you're avoiding bowing. Ear/eye protection, and remember there will be a lot of chips. If you can cut off the bulk with a metal-cutting bandsaw then that will give you offcuts to use next project and save wear on the cutter.

WD40 makes a good lube/coolant for aluminium-cutting.

Similar jig concept (but a bit fancy): enter image description here

1
  • 1
    The other downside is that even a bench-top hobby mill takes up quite a lot of space
    – Chris H
    Commented Oct 31 at 14:16
0

There are options for getting parts CNC machined and shipped to you. If I needed something like this for hobby purposes that's what I'd do. I've been looking (for work) at a UK-based firm, though apparently the actual machining is done in China. Of course if you already have the material that's not ideal.

Another option that's suitable for one-off jobs and can handle this thickness in Al is water-jet cutting. This uses an abrasive in a high-pressure jet of water, and may be available locally. You'd probably need to cut to length with your bandsaw.

You must log in to answer this question.

Not the answer you're looking for? Browse other questions tagged .