3

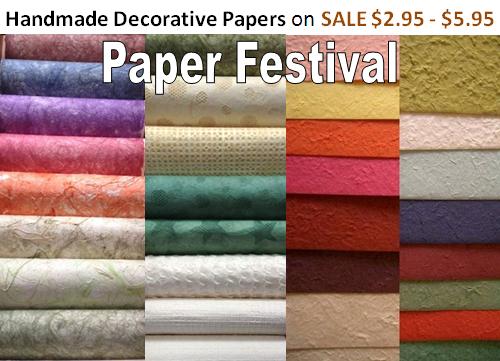
Talking about the designs on the papers from left to right, first column.

http://paintspot.ca/54-things-you-can-make-with-handmade-papers/

enter image description here

I have oil pastels, water colours and poster colours.

What is a practical way to produce such abstract designs on the paper without creating a mess?

Will the type of color matter? What kind of color should be prefered?

Will the type of paper matter? What kind of paper should be preferred?

I intend to hang the results on a wall.

3
  • 1
    The first column is not painted that way, I believe it's actually how the paper is created that makes it look like that.
    – Catija
    Commented May 28, 2016 at 14:09
  • @Catija is right, that's the various fibers that generate that marbeled effect when the pulp is scooped and dried. The article is about mulberry paper which typically has larger fibers or particles, not only super-fine pulp.
    – Stephie
    Commented May 28, 2016 at 14:18
  • 1
    @Catija that may be true. I want to create those kind of abstract patterns through colours. Hence the question. Commented May 28, 2016 at 14:20

1 Answer 1

9

There are a variety of techniques to do something called paper marbling, and some of them may suit your needs and materials.

The basics of the process come down to putting something in a painting tray, such as water or a foam (usually shaving cream), adding some paint, and then laying the paper on top to absorb the paint.

Clean up may involve removing excess materials, and generally allowing the paper to completely dry.

Generally, the paint is mixed with something to help keep it sitting on top of the water, where your paper will be. This Rookie Mag tutorial suggests using a little turpentine. Then you can use some sticks to marble the paint together. The tutorial linked has a special device made, but most demonstrations show someone using a single spare piece of plastic or wood to get it done.

You can get some really neat effects due to the way the oil repels the water. Adding drops of plain water to an area of paint will create a circle of empty space. Add a drop of paint inside it and you'll make a ring. You can repeat this to get as many nested rings as you'd like.

There are an amazing number of tutorials already out there to cover this, and a lot of different methods. If this technique is suitable for you, then you should be able to find a step-by-step guide that walks you through getting this done.

FYI, a similar technique is used for "hydro dipping", a popular way to give a tie dye effect on animal skulls. The concept is the same, and so watching the many tutorial videos about it may help give you some idea of the requirements and capabilities of the technique.
2
  • 3
    We used this method in art class (5th or 6th grade?) to make some marbled paper that was then incorporated into book covers. It isn't terribly hard, but takes some practice to avoid overmixing the swirls :)
    – Erica
    Commented May 29, 2016 at 1:21
  • Just emphasizing the use of oil based paints or inks of a different density! Some mix slightly with water and won't yield the separation of colour that you want!
    – johnp
    Commented May 29, 2016 at 21:44

You must log in to answer this question.

Not the answer you're looking for? Browse other questions tagged .